Making compost yourself... (in a proper bin I hasten to add!!)
- Moriarty the Mundane
- Apr 27, 2020
- 4 min read
Updated: May 13, 2021
Firstly, let me say how much I hope you are managing to cope in this time of Covid-19, the pandemic no one seemed to expect and the chaos that has ensued across the world in so many ways! On a personal note, sadly, I lost a friend recently to the virus and our sympathies go to his family who have set up a Just giving page for the British Heart Foundation in his memory. Superb!
Secondly, Talking about Just giving, what about Captain Tom? £29,000,000 (this morning) and counting, what a hero!!

Finally, the real point of this blog post... What are we all doing with this spare time?
So far we/I have painted the Kitchen, the halls stairs and landing and been working in the garden making good use of this beautiful weather! There are many more jobs than that but they are all mainly repairs and maintenance based, other than the homebrewed wine which I really must sort out a blog post for!??! (It's cracking wine, costing less than a pound a bottle!)
Note! Is it because we have less fumes from traffic that we are having sunny weather? They mentioned cows phart*ng were a major problem, but now, I am not so sure?!!?
Therefore, todays blog is about saving money and doing our bit for the planet by making our own compost using one of these items pictured on the right! We are now so "into it" we have two! The one shown is known as "The Dalek!"
I must say this is an ongoing project you will be embarking on, you can't just make compost today as it takes time, but, you can start today knowing full well, if you are dilligent and resonably hard working, you will have made loads of compost, by this time next year, to use for your bedding plants, general mulching and hanging baskets! You may not make enough but, you will save money in the long run and recoup your outlay in spades!! (Did you see what I did there?)
Incidentally, if your council is going to charge you to empty your green bin, depending on what you recycle through that bin you "may" be able to go without one? Thats for you to decide!!

So, how does it work and what do I do?
1) Simply put, you get a bin similar to the one above, site it in eg. a corner of your garden. Ours gets little sun, but, is sheltered beside the log store. The other is sheltered by a fence and a large Rhododendron, it gets more sun but, is no better at composting than the other. Note, it must be on a soil/grass base NOT on slabs this we have found out from experience! We believe, it's because the ants, insects and worms need to come into the bin, from below, to break everything down?

2) Get a little kitchen bin for all your vegetable waste, tea leaves, tea. bags etc. Note, no animal scraps allowed!! Then collect stuff daily and transfer to the compost bin as and when full.
3) When mowing the lawn make use of the cuttings and plonk those into the bin, I try to stir the top few inches in with the layer below to intermingle all the different layers of compost. I feel this aerates the mix and gets a better compost more quickly. Donot use clipings that you have recently used weed killer on! Follow directions on the box or bottle...
4) As the layers build up, you will quickly see that the bin is filling up, but, when you next go to fill the bin, it often seems to be not as full as last time? This is great!! The vegetation is starting to compress as it composts!
5) If you have done all of this correctly, by this time next year, you will have noticed your bin has been warm, (thats the composting heating up the compost), the grass and veggies have broken down and you appear to have a stodgy thick soil?!!?
6) Now is the time to sort out your compost ready for its purpose. You can do this a couple of three ways...
a) By use of a shovel via the small door at the bottom of the compost bin, from where you can dig out the fresh compost. Or...


b) Lay a large plastic sheet out in front of the compost bin and with the help of someone else, tip it out onto the sheet and transfer to a
wheelbarrow to spread around the garden?
c) Method 'b' above but, no wheel barrow!
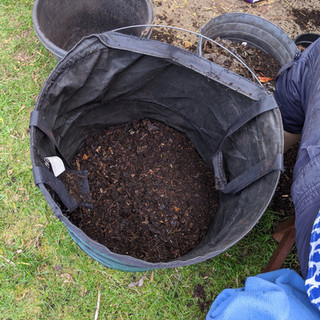
You place a large riddle on the top of a large 2 gallon bucket and riddle the compost into the bucket. Anything that doesnt go though the riddle we sort out into mulch for around the bottom of plants and shrubs etc removing anything we dont want at the same time like sticks, bits of plastic and the potato peeler you lost earlier this year! I kid you not...
At this point you have spent a day making compost as you sorted the bin out. Some goes into the bottom of the bin to finish composting or, perhaps, storage if you have no plastic sacks? We have collected plastic sacks over the years to store our compost ready for hanging baskets, planters etc etc.
The photos will give you a better idea of what I am trying to explain here?